
We all know that WordPress is installed in a web host to make our websites live. But most of the time, the live websites are not suitable for plugins and themes testing because all the changes you make will reflect on your site as well.
The best solution to this problem is to test the plugins or themes on a locally installed WordPress site. So the question arises, how to install WordPress in a local machine?
Read on the post further to know how you can do it.
How to Install WordPress in a Local Machine?
Don’t worry! You won’t need a hosting or even domain to install WordPress in a local computer. The whole site will be visible to you only. Isn’t that great?
So, now we can proceed to the full steps involved.
Step 1: The very first step is to install WAMP on your PC. It is a bundle of MySQL, PHP and APACHE web server mostly used to install WordPress used. Alternatives like XAMPP are also available, though.
Go to WAMP website and choose the correct bit version that suits your computer (32 bits or 64 bits). You can check out your OS version by checking My Computer properties. Or just choose 32 bits version as it runs smoothly on 64 bit too.
Step 2: After the download, proceed to the installation part. Do it as you install every other software. At a point, it will ask you to spot the location of your default browser. If you are using a browser other than Internet Explorer, this step is mandatory.
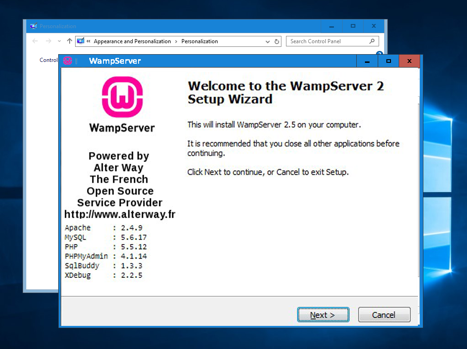
Step 3: When you finish the installation, you can see a WAMP icon on both desktop and taskbar. Launch the application from any of these places.
WAMP server comes with inbuilt PHPMyAdmin, a web application to manage database tables. After opening WAMP, select PHP MyAdmin to proceed to install WordPress locally.
Step 4: Now, you have to create a new database for WordPress. That’s why PHPMyAdmin will give you a screen of databases to create one.
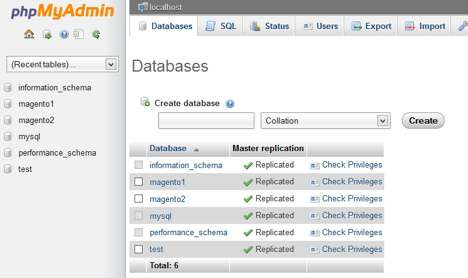
Enter a name and leave the drop-down menu as it is. Then, click Create button.
Step 5: So, the database is ready. But where is WordPress?
Download the latest version of WordPress from the official website. The file you will get is a zipped archive. You should extract the file and copy the end-folder to C:\wamp\www.
You can rename the folder to anything. Here, we just gave the name mysite.
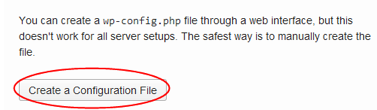
Step 6: Go to http://localsite/mysite. This is the web address of your local WP site which can be seen only by you.
Now you can’t see the WP site there because we haven’t completed the installation yet. What you will see there is a missing wp-config.php notice. Click Create a Configuration File button on the browser tab.
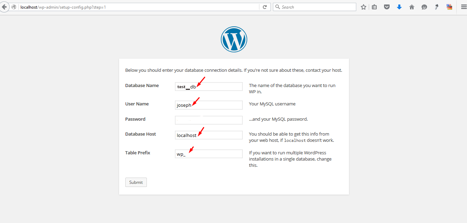
Step 7: We need to insert the database details here. The database name is test_db here because that’s the one I have created in step 4. And, leave all the fields as it is. (You can change the database username if you want, though.)
Click Submit. You can see a success message soon after this.
Step 8: The only thing left to do is the installation. You will be provided with a Run the Install button on the next screen.
Step 9: If you ever installed WordPress online, you would fill a form with username, password, and other details. The same will be shown here as well.

You will get a success message whenever the installation gets finished. The dashboard can be accessed by clicking that Login button you will see on the last screen.
Whoa! You know how to install WordPress in a local machine now.
A WAMP Troubleshoot
Are you using Skype? The, it may create a conflict with WAMP as both of them use the same 80 port. You need to release port 80 from Skype to get rid of this issue.
Launch Skype and go to Tools>> Options. Choose Connections and then proceed to Advanced. Check whether the option that says Use port 80 and 443 as alternatives for incoming connections is unchecked or not. You should uncheck it to avoid the conflict with WAMP.
Bottom Line
I hope you now know how to do a local WP installation, don’t you? From now, you can test any plugin or theme from your local WordPress. No need to ruin your primary site with malware or filthy stuff.
I welcome your queries via our comment forms. Have a second to show us some love by sharing this post on social media.
